Building an AR in 6.5 Grendel
I’ve never been shy about my affinity for firearms. This is fairly wide-ranging and includes the AR-15 platform. I own several, and have built several more. However, it’s been several years since the last one, so with some extra time on my hands due to the recent viral pandemic I decided to try my hand at a new project. It would prove to be a bit of a challenge, as I wasn’t the only one decide on such a project. Product shortages and delays would cause problems throughout, but local availability and alternate sources were found to continue the work, as well as helping with assembly.
As I don’t hunt or shoot long distance ranges, I decided I wanted a rifle that would suit both purposes. I have bolt actions in 6.5 Creedmoor that fit those bills, but there’s something about an AR that appeals to me. For one, I like semiautomatics more than manual actions, and for another, I like the customizability found in an AR. There’s a little more of “me” in them. That said, it’s tricky to make decisions on that basis without a defined mission (which sounds presumptuous as heck as it is), so I thought it’d be interesting to go through those choices in case anyone is interested in a do-anything build that’s more than a mostly-already-done kit build.
Why 6.5 Grendel?
As there’s no specified “mission” here, the true starting point is selecting the the caliber around which to be built. I’ve long wanted to explore the realm of the 6.5 Grendel…despite it’s relatively niche position in the AR market, in my estimation it’s truly the best all-around AR cartridge. Why?

- Range – While other cartridges do just as well and better at distance in an AR package (.224 Valkyrie springs to mind) the Grendel is remarkably flat-shooting up to 800 yards and quite capable of hitting at 1000 yards. The 6.5 caliber is renowned for bucking wind sheer and flat-flying trajectory by virtue of its relatively-low ballistic coefficient (determined by bullet geometry), and the Grendel round benefits greatly from this.
- Delivered Energy – The 6.5 Grendel packs more energy than a .300 Blackout, 7.62×39, 5.56×45/.223 Rem, .224 Valk and most other typical AR calibers due to the velocity of the bullet and its weight. Additionally, by virtue of its relatively-high sectional density (ratio of a bullet’s weight to cross-sectional area) the bullet tends to penetrate better and dump its energy deeper making it more effective at stopping whatever it’s being fired at.
- Recoil – With the Grendel you’re getting in the neighborhood of .308 Winchester capability with a kick that’s a little heavier than a 5.56 round. Less punishment, quicker follow-up shots, eaiser target spotting through the scope….what’s not to like about less recoil?
- Price – Bullets can be had for less than 6.5 Creedmoor or .308 Win despite comparable capability, and an AR-15 are generally cheaper than an AR-10. The main cost of the build comes in the higher cost of a bolt and magazines, which is not a day-to-day factor.
- Size – In short you get many of the benefits of an AR-10 in a far lighter, more balanced, easier to maneuver AR-15 package.
Certainly, there are negatives to the cartridge. Barrels are said to wear faster, but chances are I will never shoot out a barrel, and if I did it’s a matter of swapping another in its place. Plus, some parts can get pricey, but that’s custom for you.
To be completely honest, I’d come to this cartridge conclusion years ago but decided to concentrate on 3-gun. Since that’s not been an option most of this year I finally gave in to this rather long-term inclination.
Choices, Choices…
So, once the caliber was decided, it was time to figure out what components would go into this build. I determined that it would not be a budget build but not hyper-premium, either. Therefore, no bargain-basement parts would be considered, and no high-end part would be dismissed out of hand unless a lower-tiered part would serve just as well.
Barrel and bolt
Since the heart of any rifle build is the barrel, I started looking at Grendel barrel makers. While there are more than a few there are not scads of them which helps in choices. I had determined I wanted a stainless steel barrel since it’d be easier to maintain at the expense of lower bore life (but, again, I don’t expect to ever shoot it out). I wanted a bull barrel with fluting for heat dissipation and lightening, and I originally wanted everything in a raw stainless finish. However, it’s here where supply issues began to crop up, and I wound up looking into lighter profiles out of necesssity. Having gone with a Faxon Firearms barrel in my .300BLK pistol build (which would make for an interesting write-up itself) I looked hard at them again…they aren’t top-tier, but they tend to be good, and my previous FF barrel was great. It turns out they have a complete bolt carrier group in Grendel as well, so I bought both from Rainier Arms, as they had a service to check the headspacing of the bolt to the barrel chamber. However, as both parts shipped from separate facilities halfway across the nation from each other, I suspect that never happened.
Uppers and Lowers and Hardguards, Oh My!
As for upper and lower receivers, I wanted something that was not yet another mil-spec standard set, but I wasn’t interested in getting a billet set. I like elegance in my stuff, so I wanted something that looked nice and stood out but understated and not overly priced at the same time. If you’re going to get a billet set, why get something sedate? So I looked into the forged M4E1 sets from Aero Precision, and I found exactly what I was looking for: good looks and fair price for a matched set. Again, supply issues cropped up, and it was tough finding one. I eventually found a lower from Primary Arms’ site.
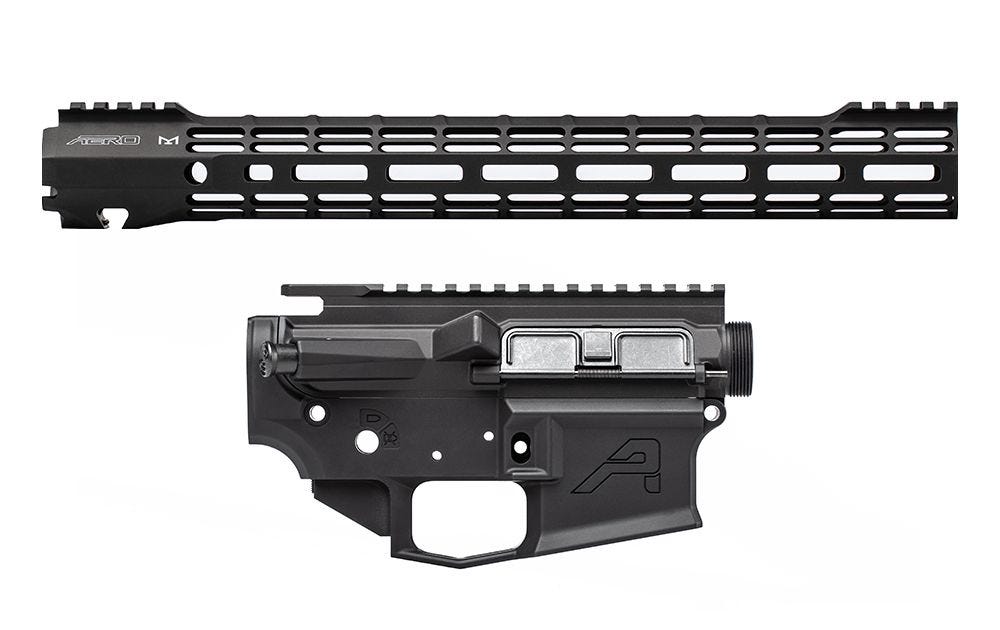 Finding an upper was no mean feat, however. I backordered one from Midway USA with no idea how long that would take. However, Aero Precision had a blemished unit available for less on their site…since I’d already intended to have it refinished I figured that would be fine. I was right; there were about three nigh-imperceptible blemishes above the ejection port and a tiny void under the brass deflector. All of which would disappear under a coat of ceramic polymer. Naturally, after I’d received it the Midway order arrived far ahead of schedule, but Midway being an awesome dealer took it back with no trouble.
The next thing I wanted to look at was a handguard. While perusing one of my local dealers, The Range at 601, I noticed they had a lineup of nice pieces, some from Odin Works (really, really nice), some house brands (weren’t bad at all), but I kept looking at the Aero Precision ATLAS units. They went perfectly with my upper and lower, and there was a choice of an R-one (full rail across the top) or an S-one (only a short rail on the muzzle end). Loving the light weight and clean look, I chose the 15″ M-LOK unit (I like the longer rail for arm extension, and the M-LOK/KeyMod war is over, and Magpul won), and since it was in stock I didn’t have to worry about shipping or backordering anything!
To Paint or Not to Paint?
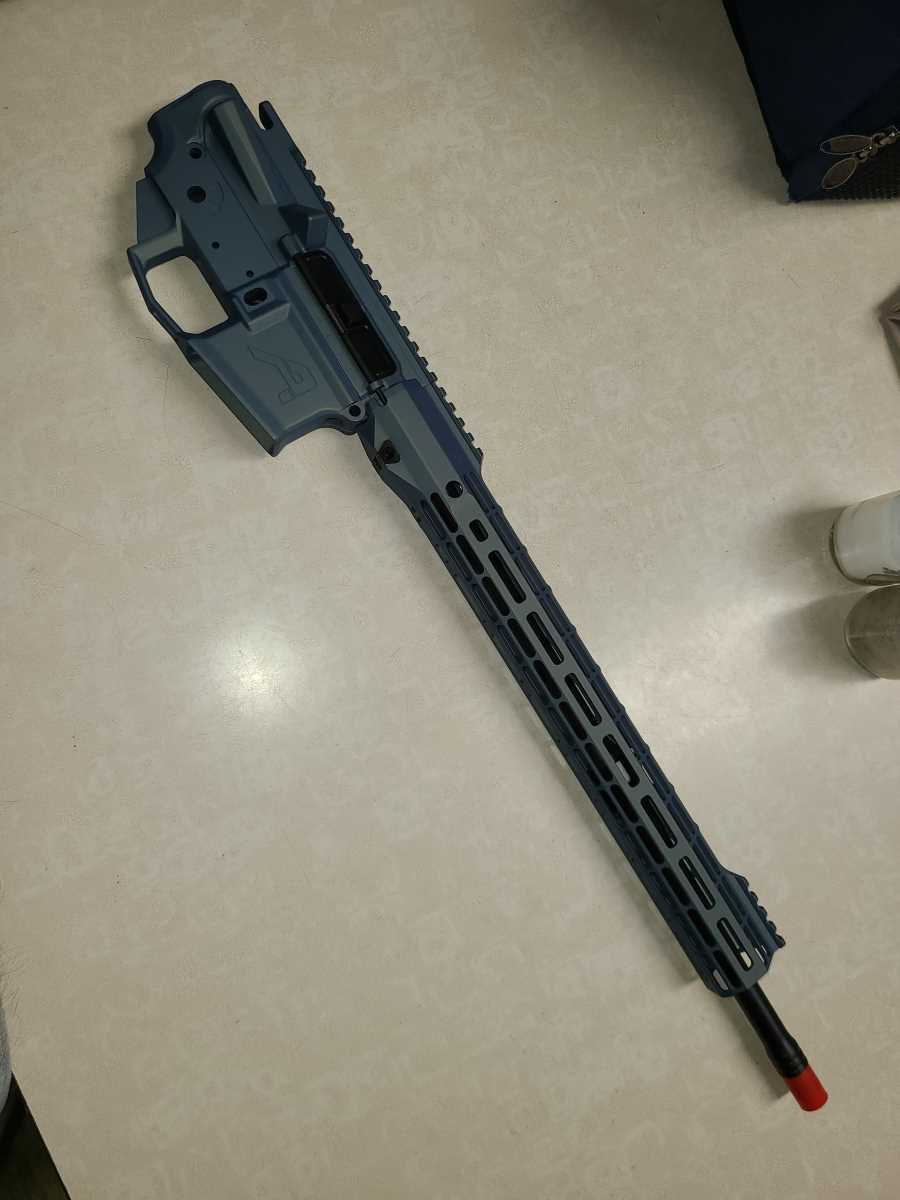
From the beginning I had planned to have this project Cerakoted. For those not in the know, Cerakote is a baked-on ceramic/polymer coating that provides corrosion, wear, and abrasive resistance and comes in a variety of colors. While black nitride and anodization is fine for a typical firearm, I wanted more protection and more color to set things off. I’d built a Glock-style pistol for competition earlier in the year and decided I wanted a similar color to the “Blue Titanium” used on the slide of that gun…I liked that blue, but there were a lot of other color choices that made that gun stand out. It wouldn’t really “pop” on a rifle, in my mind.
The color I wound up going with is called “Northern Lights”…as described by the web site it’s “a stunning color-changing navy blue that transforms into a greenish teal with glistening gold metallics.” I liked the sound of that. The Range at 601 handles Cerakote jobs through a local applicator, so I asked them to run my receivers and handguard out to Lockhart Munitions just southeast of town. I asked for the Northern Lights Cerakote with a distressed finish in order to keep it from being shiny.
The Waiting Is The Hardest Part
I figured the Cerakote job would take up to six weeks, so I started looking into things like furniture, muzzle devices, and the like. I was already sure I wanted a Griffin Armament muzzle device with taper mount so I could use my GA Recce 7 suppressor on it. The Recce 7 was awesome on the Creedmoor bolt actions, and I just put a FlashComp unit on my competition AR so I just picked up the same thing for this build. Plus, 601 had it in stock. I also picked up miscellaneous build parts there, the majority of which were Aero Precision because that’s what they had available.
I went with an Odin Works Low-Profile Adjustable Gas Block because it was in-stock, as well, but also because the previous adjustable block I’d used, a Superlative Arms bleed-off, was not available anywhere…besides, I didn’t really care for the bleed-off function, as it just made it more complicated with its 30 adjustments and dirtier with more gas and carbon blowing out the front.
I also knew I wanted a stock with a nice cheek-weld, so I was leaning toward the Magpul MOE-SL stock. One of the guys at 601, Les, said he liked the B5 Systems SOPMOD Bravo. While researching it I found the BCM Gunfighter Mod-1 SOPMOD stock with storage compartment that looked like everything I wanted in a stock.
While checking into charging handles, I knew I wanted an ambidexterous T-handle, and I wanted one that re-routed blowback gases for use with a suppressor. The Radian was a natural choice, but Griffin Armament had one, as well, and the main thing they had in common was a high price. I found one from Armaspec, the Victory Charging Handle, that did everything they did for less. I had also been looking at Armaspec’s Stealth Recoil Spring system, as I loved the JP Enterprises Silent Captured Spring system in my .300 pistol build but couldn’t see spending so much on a unit that won’t be suppressed full-time. I’ll be getting one as soon as 601 gets them in stock, but until then I’ll just stick with a standard buffer and spring set I had in my parts box.
I also decided to go with a ratcheting castle nut rather than a standard one so it would hold solidly without having to torque the stew out of it or stake it. I found also a QD mount was included in the set, so I was quite gratified to place an order for the Primary Weapons Ratcheting Castle Nut and QD End Plate…this of course is backordered, so I’m using a conventional set I had on-hand until it arrives.

Another problem with the Grendel choice is magazines…you can’t just grab a PMag off the shelf and expect it to work given the feed lips must be spread more than on a standard STANAG 5.56/.223 magazine. So I went back to the originator of the 6.5 Grendel platform, Alexander Arms, for the answer: I ordered three each of the E-Lander steel 10- and 24-round magazines.
Finally, the trigger…for some reason I screw up installing mil-spec triggers all the time. I know how to do it, but I either have pins walking out or put the hammer spring in backwards (hello, James! Hope it’s running better now since I corrected it). I went with a drop-in recommended by Paul at 601, and for the price and availability I couldn’t argue with a CMC Drop-in Standard Curved Trigger (3.5 lb Pull).
Assembly notes
Once the receivers and handguard arrived from Cerakote, I was ready to do some assembly. But first, the oohs and ahhs…everyone loved the color. Kudos to Ben at Lockhart Munitions on a great job! I think there will be a few more Northern Lights units running around Meridian area in the near future. While there I got Paul at 601 to install the barrel and handguard as I don’t have a bench vice or a reaction rod at home. Once I got it to the house I started assembly, and let me tell you, from now on I will likely be using the M4E1 series of receivers. They’re so easy to put together…no punches or hammers required at all! Everything is put in place with set screws. No marred finish, no pins that look like they were hammered in with a sledge. I will say that before I build another AR I will be buying a 1/4″ clevis pin for putting in the front take-down pin detent. I will be heading over to 601 next week to have the muzzle device torqued in place. I have a wrench but no crow’s foot to fit. Plus, the lack of a bench vise is really hurting my home capability. Everything else is ready to rock, except for one thing…
Scope of Work
I knew this would not be a CQB gun (although it could be), so a proper scope was in order. This is where I was most clueless, as I’ve never been much of a rifleman…most of my rifle work involves shooting varmints with various firearms at distances easily surveyed by the naked eye and open sights or red dots. The only real scope work I’ve done is using an Primary Arms ACSS scope on my 3-gun AR which is just a bit like cheating as there is no figuring required to be good enough to excel. But when it comes to ranging and calculating distances and bullet drop and doping, I’m virtually a neophyte who is barely able to speak the jargon. I knew I wanted quality glass with a gun with this capability with a good reticle to accompany it. And quite frankly I didn’t want to buy yet another Chinese-made scope, no matter how good the company behind it is (I say this as a repeat Primary Arms customer).

Amongst all the options I was checking out I happened on a Steiner P4Xi 4.16-56mm scope with reticle and adjustments in mils for a pretty hard to believe price at Camera Land New York. Reading the reviews, earlier versions had a problem with turrets that had apparently been resolved after it was discovered, but the stink of those early low scores seems to have driven the price down some. Looking on the site I was able to get the Steiner P-series cantilever mount along with it for about half the MSRP…score!
Of course, when I went to torque it down I nearly had a meltdown when my torx bit broke off in on of the mount’s screw heads…luckily it wasn’t wedged in and fell right out. Oddly enough, I don’t know why it broke, as the screw wasn’t even hand tight in the mount. It’s what you get for using cheap bits, I suppose. I was having to use my torque wrench on it, which couldn’t have helped: I was going to use a torque driver from work, but lo and behold it was broken when I picked it up. That stuff drive me nuts, so I guess I’ll have to get someone to mount it for me or find a torque driver myself.
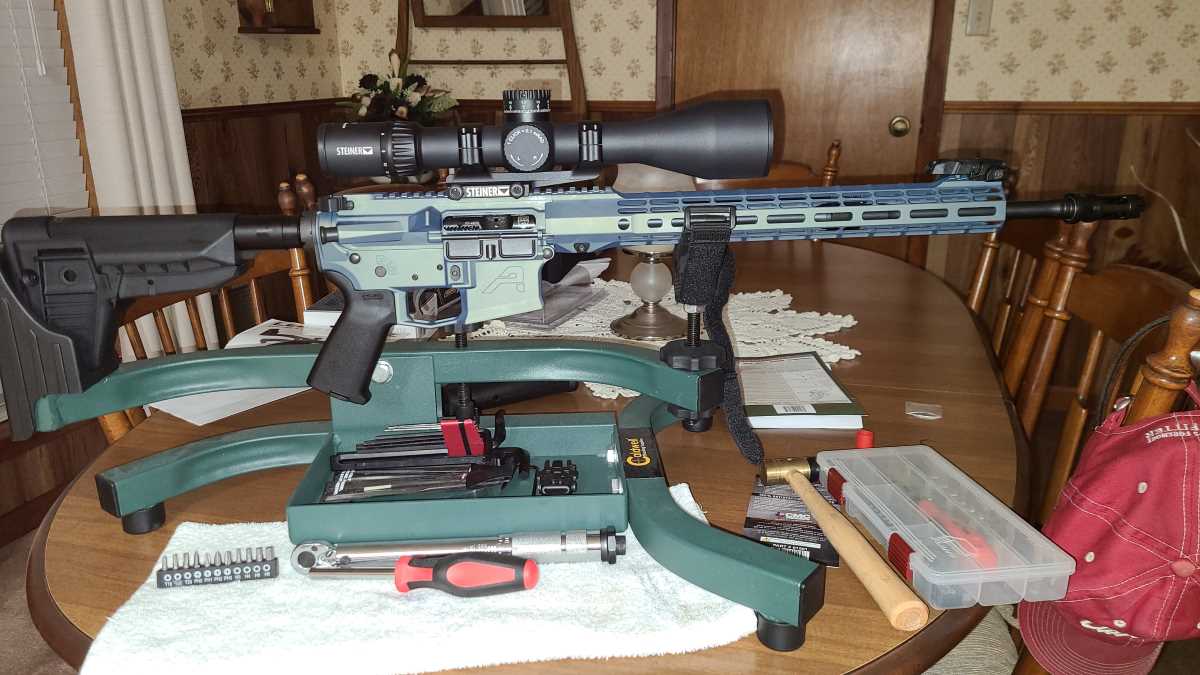
Finished results
The result is pretty nice looking. I decided against shooting it as neither the muzzle device nor the scope have been completely mounted yet. I received the three ten-round mags yesterday, so it’s ready to shoot. I’m still somewhat worried about head-spacing, but I’m not detaching the barrel and sending it back…I’ll just trust that they’re actually mil-spec.
Construction continues, but updates to this article will be posted as they happen. A final price list will also be posted.
Final Parts list
Faxon Firearms 6.5 Grendel 416-R Stainless Gunner Barrel MATCH SERIES – 18″ – $232.75, Rainier Arms
Faxon Firearms 6.5 Grendel 9310 Bolt Carrier Group (BCG) – Nitride – $156.75, Rainier Arms
Aero Precision M4E1 Stripped Lower Receiver – Black – $84.99, Primary Arms
M4E1 Threaded Stripped Upper Receiver – Anodized Black – $78.74 (blem), Aero Precision
ATLAS S-ONE M-LOK Handguard – $199.00, The Range at 601
Aero Precision AR15 Upper Parts Kit – $19.99, The Range at 601
Aero Precision AR15 MOE Lower Parts Kit – $49.99, The Range at 601
Aero Precision Enhanced Buffer Tube – $33.99, Brownells
Aero Precision Mid-length Melonite Gas Tube – $14.99, The Range at 601
Odin Works Low-Profile Adjustable Gas Block – $79.99, The Range at 601
BCM Gunfighter Mod-1 SOPMOD stock with storage compartment – $69.99, Brownells
Armaspec Stealth Recoil Spring system – pending
Armaspec Victory Charging Handle – $54.99, Brownells
Primary Weapons Ratcheting Castle Nut and QD End Plate – $26.99, Brownells
E-Lander 10-round Steel 6.5 Grendel Magazines – $29.99, Brownells
E-Lander 24-round Steel 6.5 Grendel Magazines – $29.99, Brownells
CMC Drop-in Standard Curved Trigger (3.5 lb Pull) – $157.24, Brownells
Steiner P4Xi 4.16-56mm scope
Steiner P-series cantilever mount – $929.99 (scope/mount combo), Camera Land NY
Updates: the rifle is complete, but I caught a nasty case of COVID around the time I got everything put together. The head-spacing was good to go out of the box, the scope is phenomenal. I have a few more builds to document since this one, but blogging as usual has taken a back-seat to everyday life. More to come!