Fifty Shades of Grayskull
(a most excellent site for anyone interested in MOTU)
As a bonafide child of the eighties, Masters of the Universe was inescapable. Like many others of my generation it was imperative to tune in the daily episodes of the Filmation show and re-enact them on my own using my own collection at home. The primary setting for these epic conflicts was, naturally, the same as the show: Castle Grayskull, fortress of mystery and power!
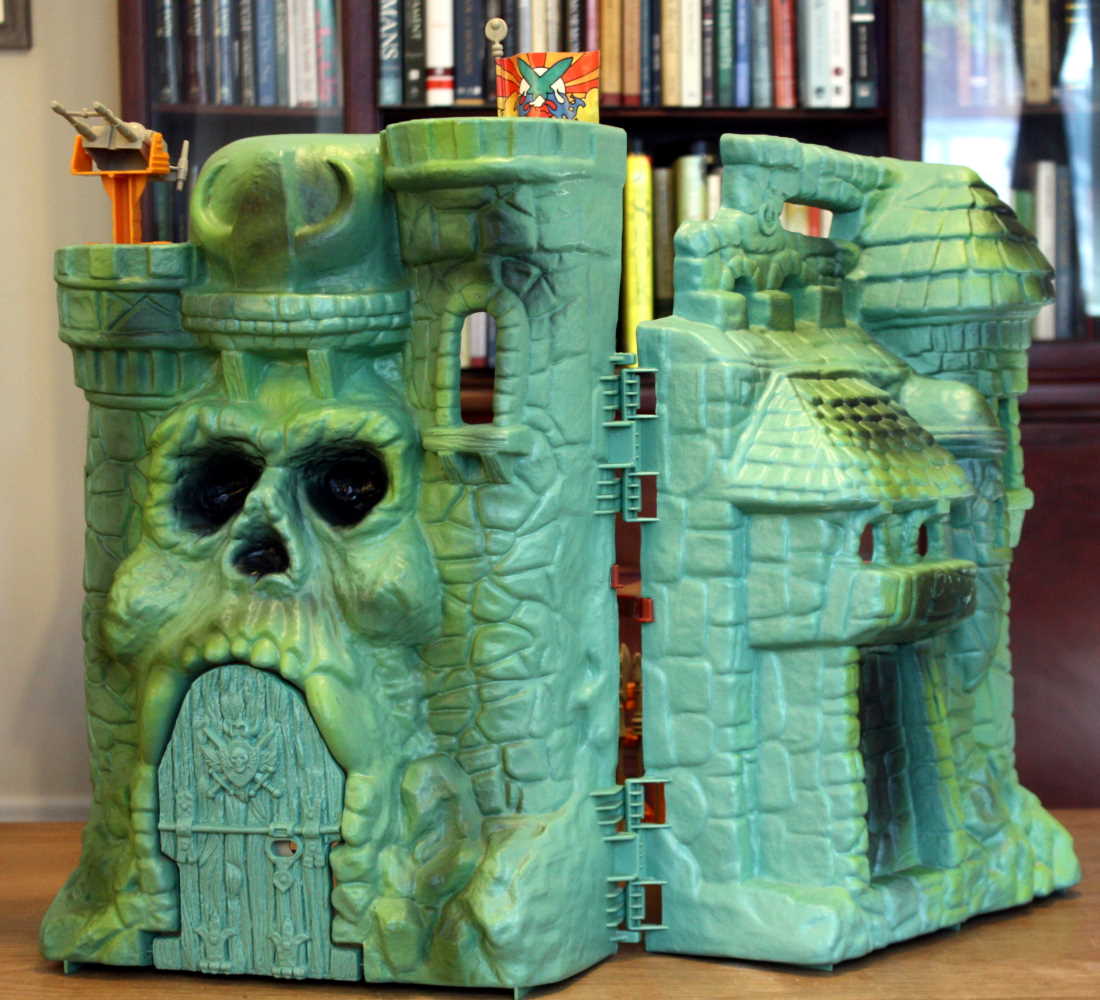
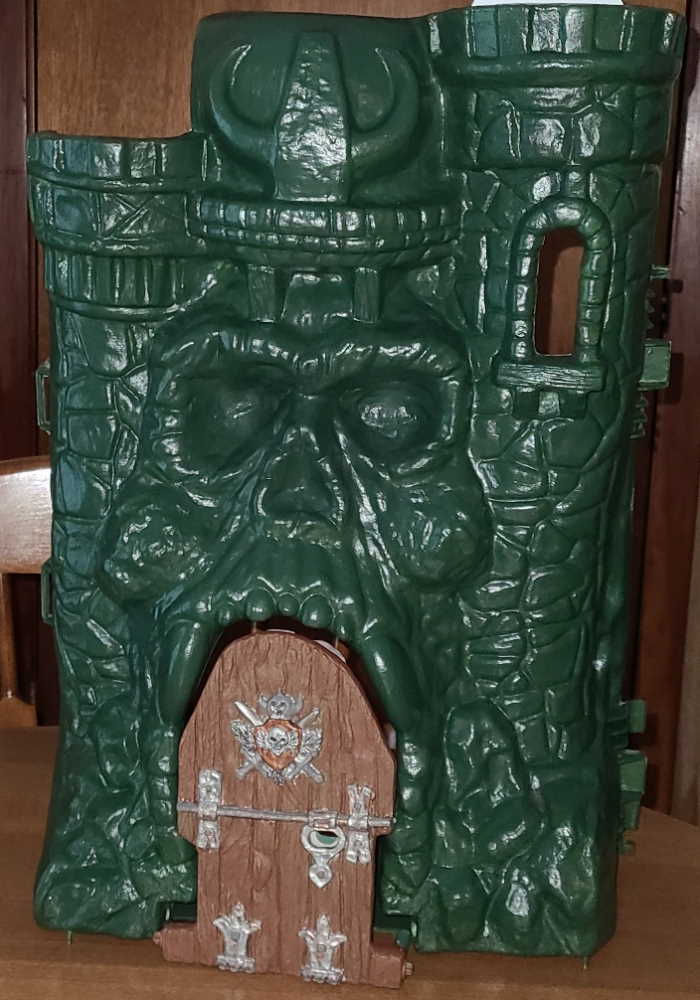
While imagination made all the difference back in the day, when you look back forty years later you begin to realize that this was…well, not the highest quality item by any stretch. The structure was dreadfully thin and wobbly. Sure, it went together well, but there was only so much rough-housing it could handle. The parts were cast in cheap, brittle plastic…just consider all the broken thrones, trap doors, and elevators. There’s a reason complete castles with undamaged components go for so much! And the paint decoration was certainly not uniform, except for how uniformly awful it tended to be.
But…we can rebuild it. We have the technology. At the very least, we can repaint the thing!
This idea has been in my head since I was a child. But while I’ve always enjoyed looking at painted action figures and models from the peanut gallery I’ve never entered that arena due to time and intimidation. Many of these folks are artists in their own right, whose submissions are simply outstanding, having been generated using talent cultivated over years of effort and critique. I just never had the time (or gall) to devote to it in order to get to an acceptable level. Besides, repainting that generated old monument to 80’s childhood smacked of sacrilege! (The only figure I’d ever tried to doctor was a Generations Thunderwing from 2010 which was in dire need of some panel lines, but I digress.)
Enter: Masters of the Universe Origins. When I saw this was coming out, I took notice because, unlike earlier lines, this one was designed to emulate the original line from the 80’s with actual joint articulation. And it was an opportunity to entertain that inner 5 year old in a whole new way. And one of the promised offerings was a NEW Castle Grayskull! Surely this would make a great canvas for such an undertaking…but modern life grabbed hold, with the pandemic and modern distribution lines breaking down and throwing a wrench into the works. It was a year before I actually saw one, and when I did…it’s just not the same. The old castle has a creepy, almost living feel with its disproportionate face and skewed-from-center orientation. The new one just won’t do!

Luckily, a few months ago, some friends and I visited a toy fair held at a local community college. It was fun looking at all the old vintage stuff, but in the middle of it all I ran across a whole shelf of original Castle Grayskulls for around thirty bucks! I looked through them and knew I’d hit the jackpot. The seller was willing to let go of a shell with the two big floors inside (one with a melted Orko figure stick on it, but anyway :p) and some broken latches for $20…score! The guy was probably glad to offload an old hunk of plastic, and I finally had my canvas.
Having followed model and action figure customization over the years I have picked up a lot of information about painting techniques and methods that would prove valuable in this pursuit. The first decision was to use acrylic paints due to them being easy to find and clean up behind. I practiced on a spare Origins Skeletor (my all-time favorite fictional character…myah, ha, hah, ha!) I had picked up for a song to get a feel for painting. I think it turned out okay, particularly for a first try. It gave me some confidence and really motivated me to get started on the big boy.

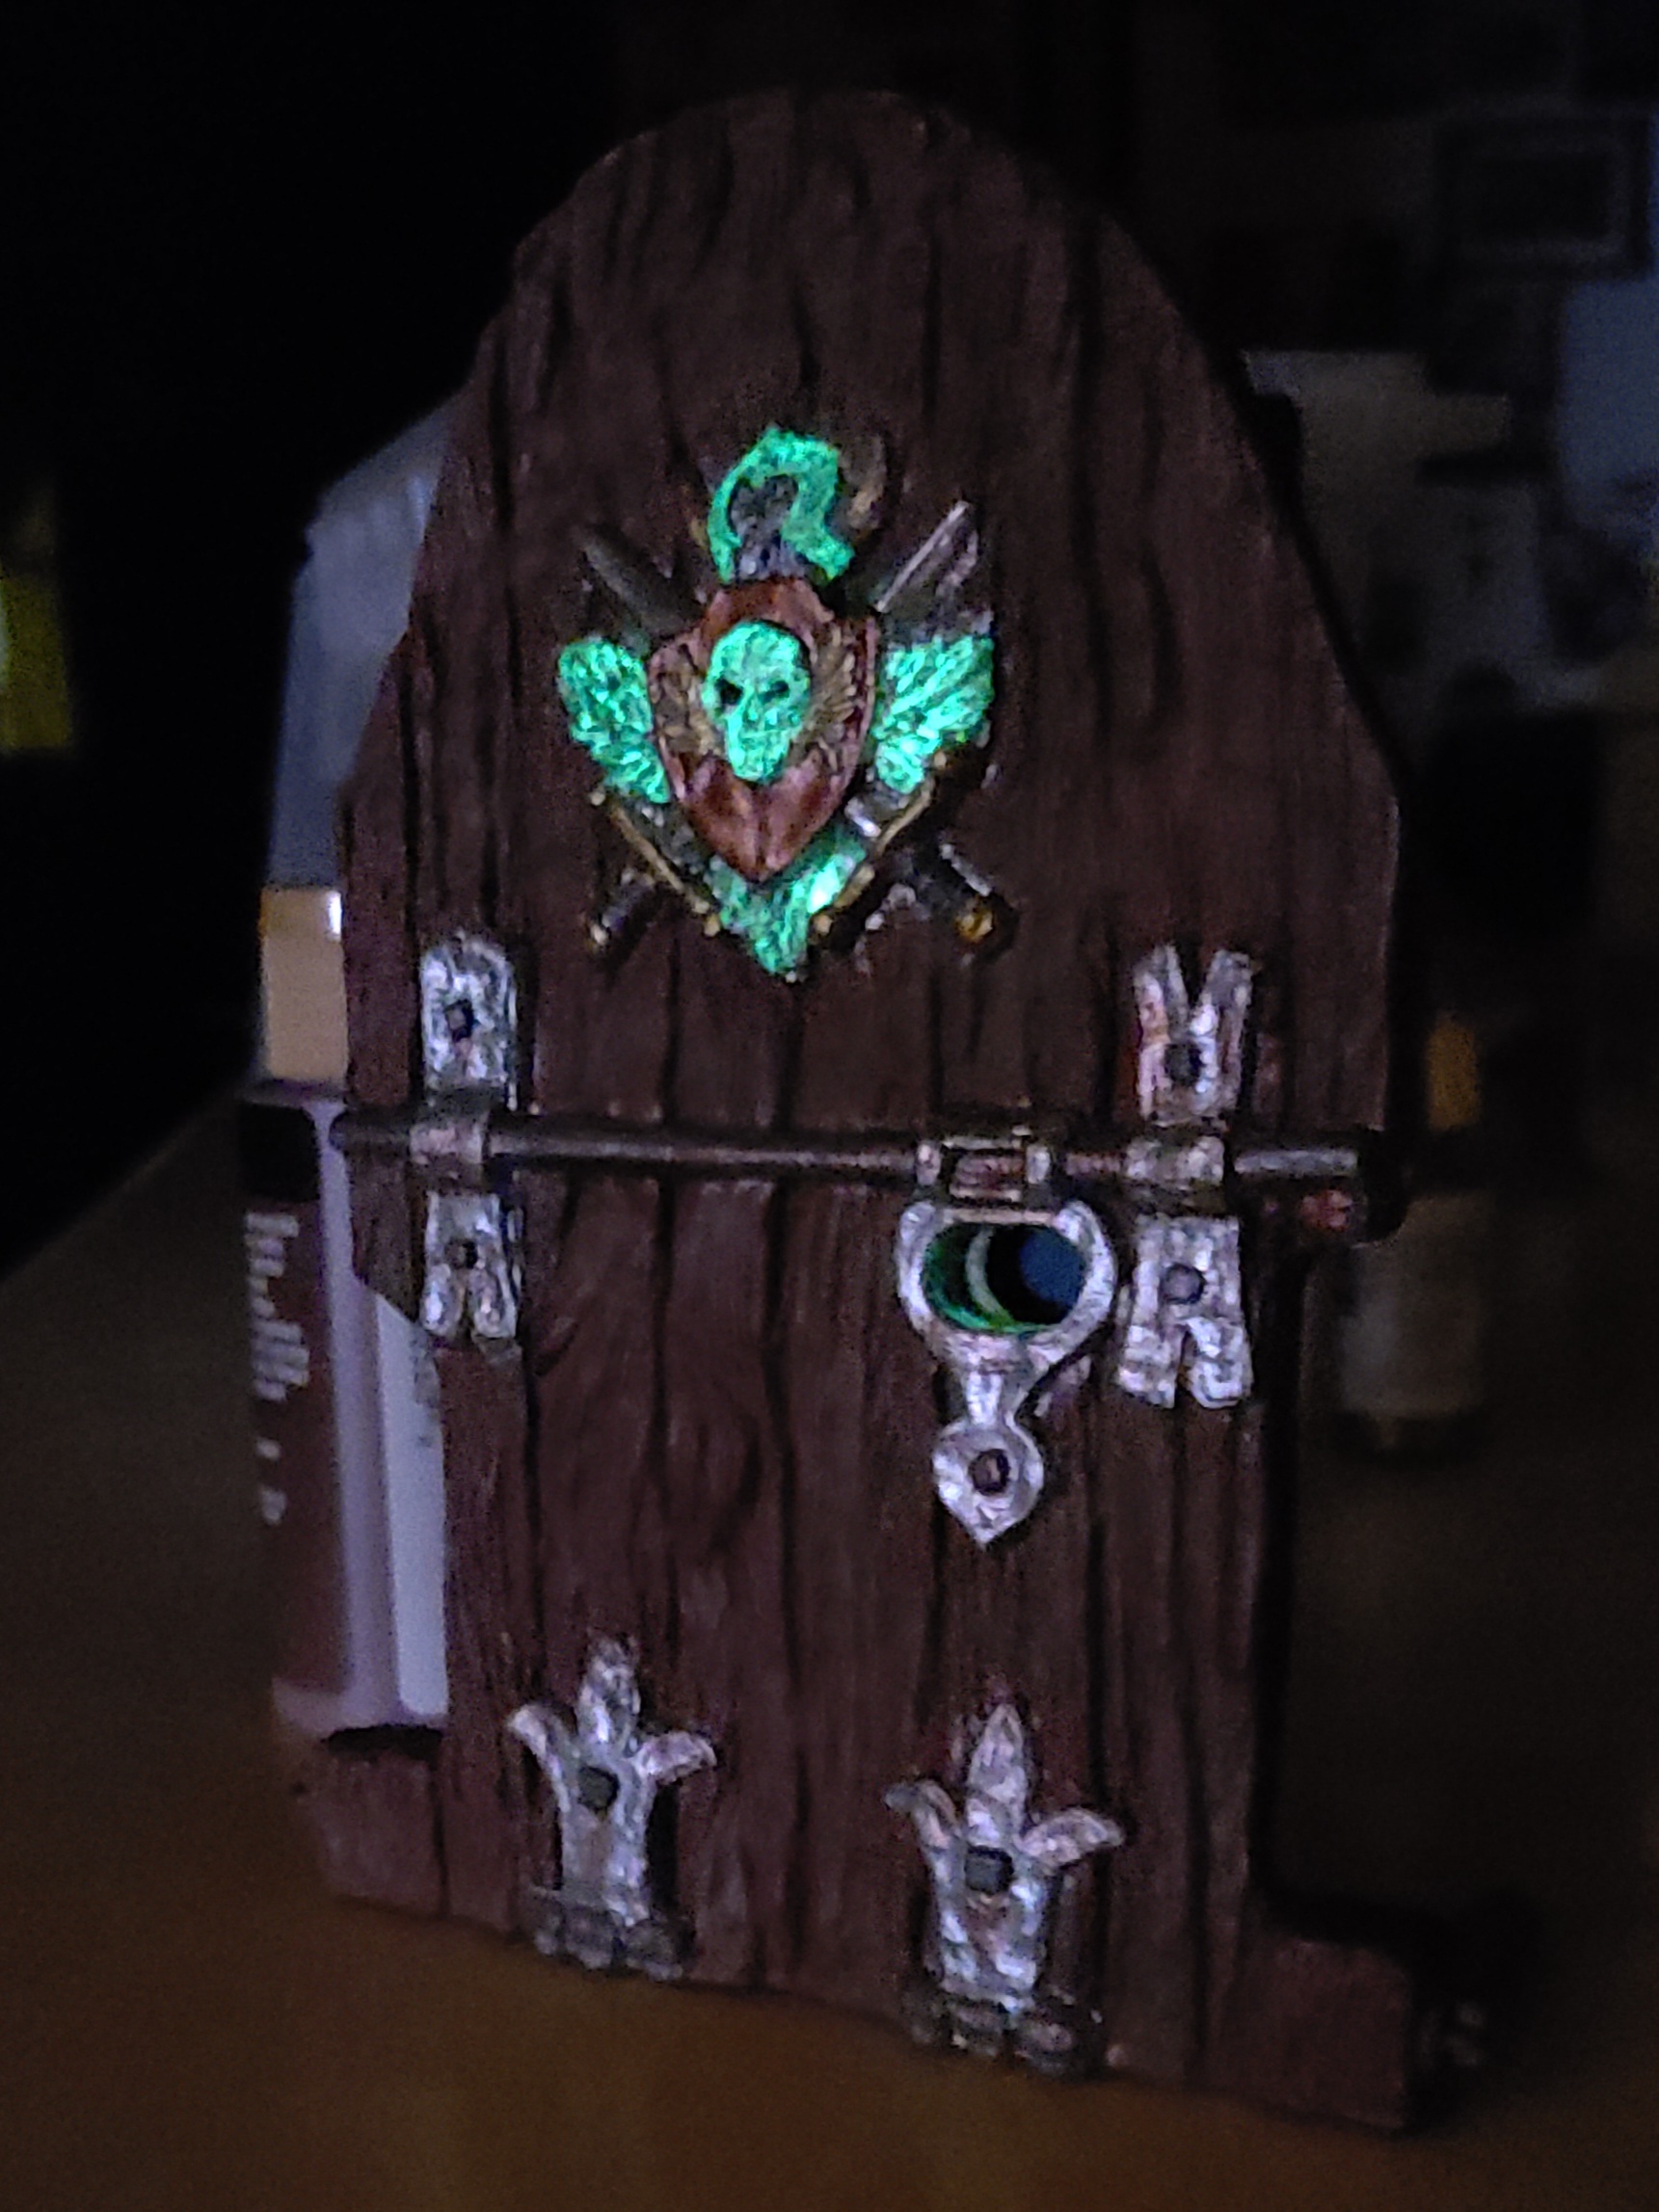
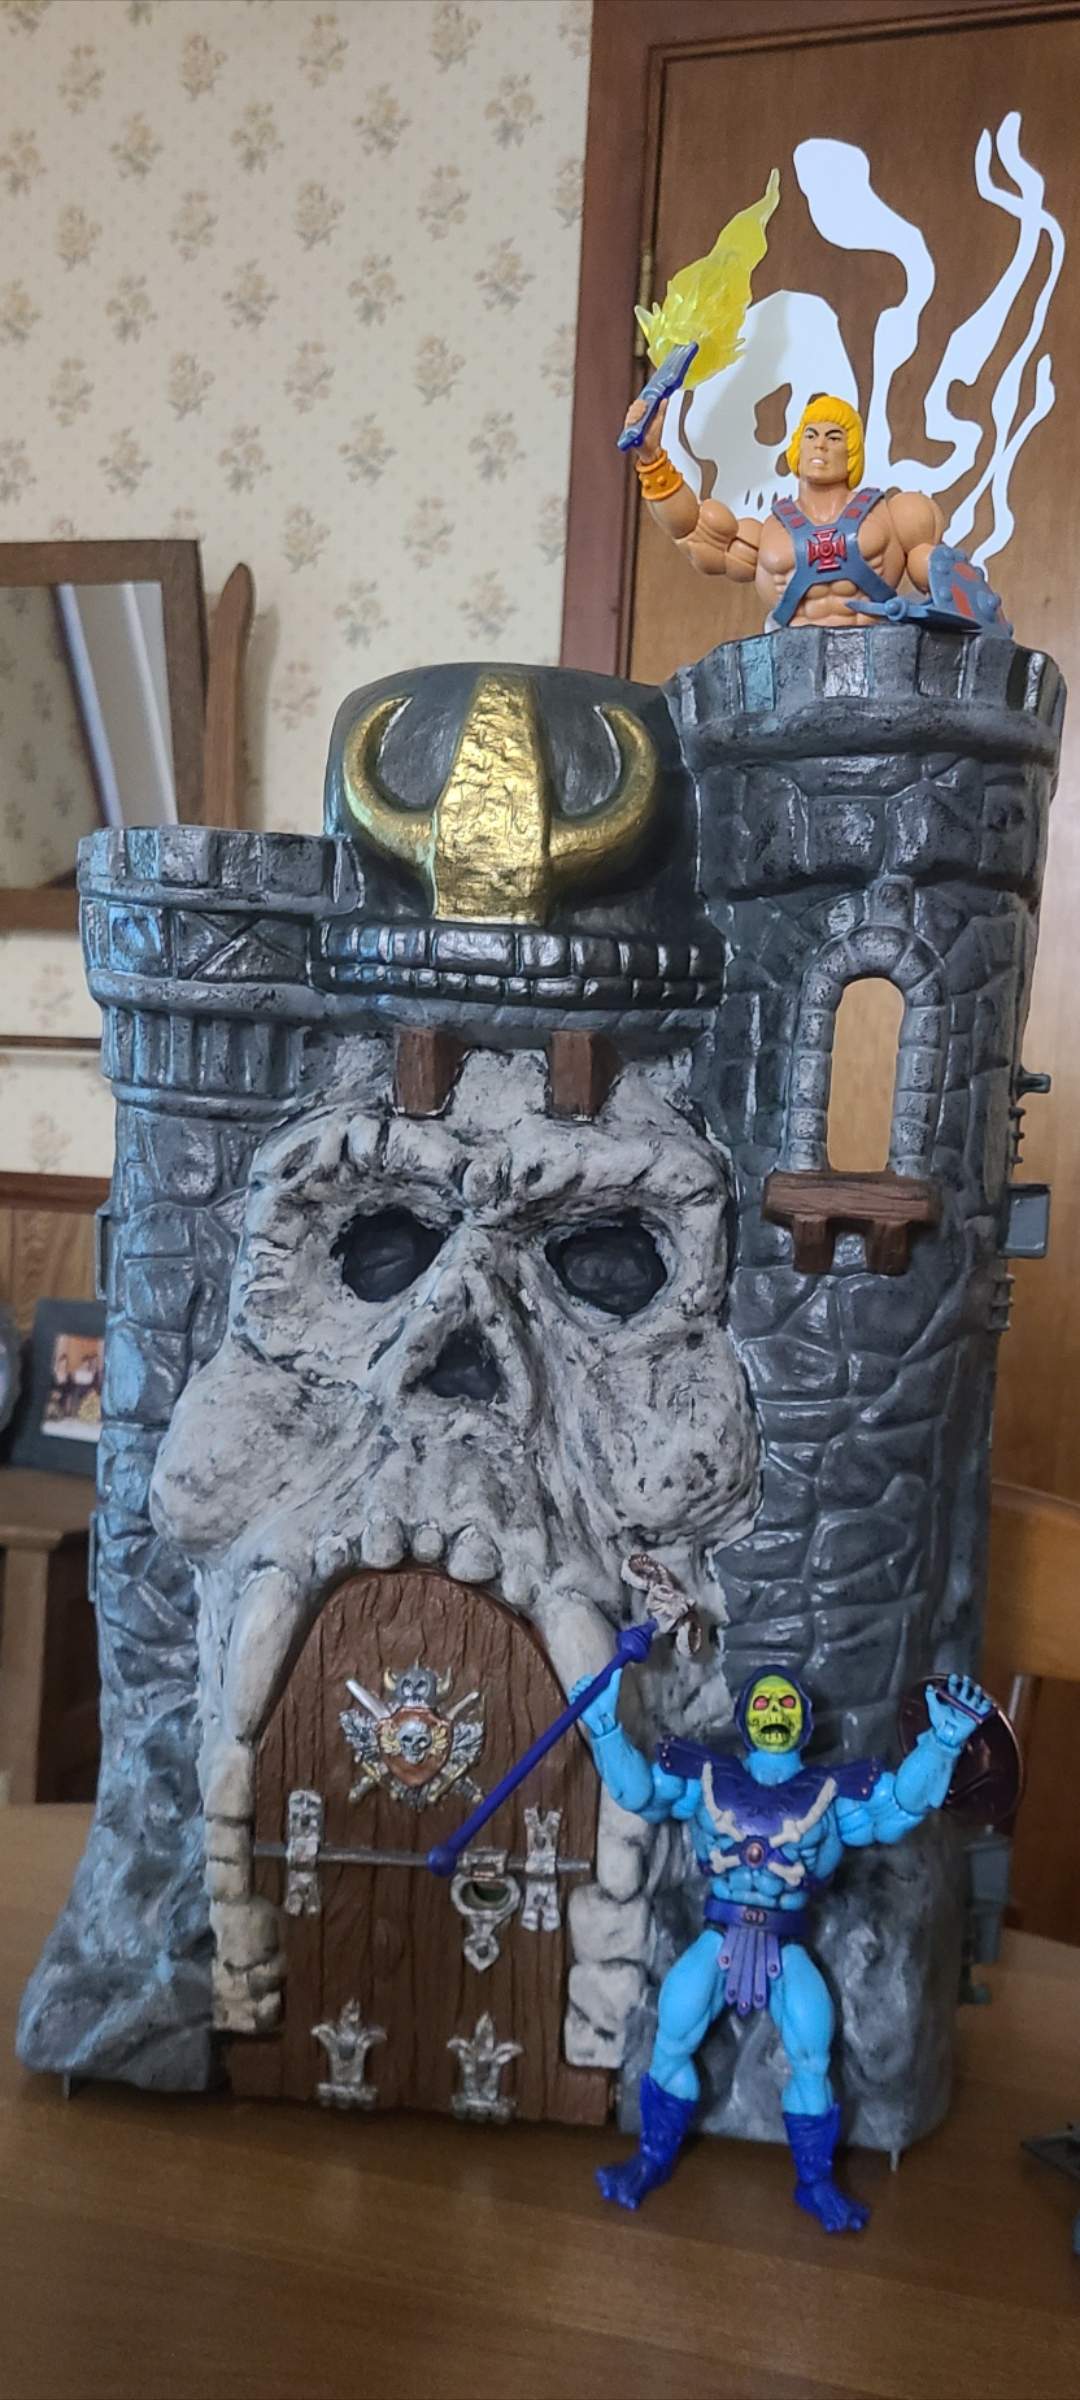
Naturally I started with the door: bark brown with silver metal work and crest. It looked good, and the hint of green showing through gave it a neat moldy look. But the two tone paint job was just a good start: a little dark gray on the nails, lock bar, and crest swords have nice contrast; and some antique copper really brought out the crest shield. It also created a very nice sense of rust running down from the metal parts. The final touch was the golden crest wings and some sneakily placed “glow” paint! I’m not done with it as I’m contemplating a little black and glow in the cracks, but overall I’m very pleased with how it turned out. It nearly flamed out, though, because after the first session of painting I dropped the door onto the kitchen floor, shattering one of the corner hinges! After a mild meltdown I serious-ed up, assembled the broken pieces, fetched the super glue and modeling compound, and set about to work, and–voilà !–a repaired door ready to be repainted! Crisis averted.
Eternia-style
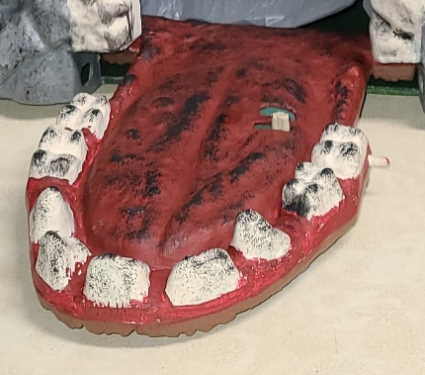
Then I set forth to work on the inside of the door–which was historically known as the jawbridge–which brought me to another valley of decision. Should it be set as plain green, a stoney-gray construct, or should the inside of a giant mouth? I chose the latter, as I’ve never seen it done that way before, and I thought it’d be striking. And it was! A burgundy-red tongue with ivory teeth all blotched with black gave it a somewhat unsettling but undeniably fresh look…insofar as a deteriorating mouth in a skull-faced castle can look. That brought the door design to a satisfying conclusion, which meant it was time to really get down to business and tackle the front fascia.
My first shot at the castle proper involved laying down a base-coat of thicket green paint, which seemed to be a misstep. I decided against black as I figured it would be difficult to paint over, and green would go over better and give a lichen-y bleed under the gray brickwork. The latter wasn’t the case, but it does show up between the bricks, which means I’ll have to do a black paint-wash before it’s over with. But this led up to a welcome development that will be explained later! In any case, it was base-coated green, and it wasn’t horrible.
Q: What is a paint-wash?
A: Paint-washing is a technique where paint is thinned in order to color low-lying or difficult-to-brush areas via gravity or capillary action. The general area is typically wiped with a damp paper towel or sponge to remove the wash from the top-most part. This technique is often used to bring out sculpted details and create depth. It works best when washing darker colors on top of lighter ones.
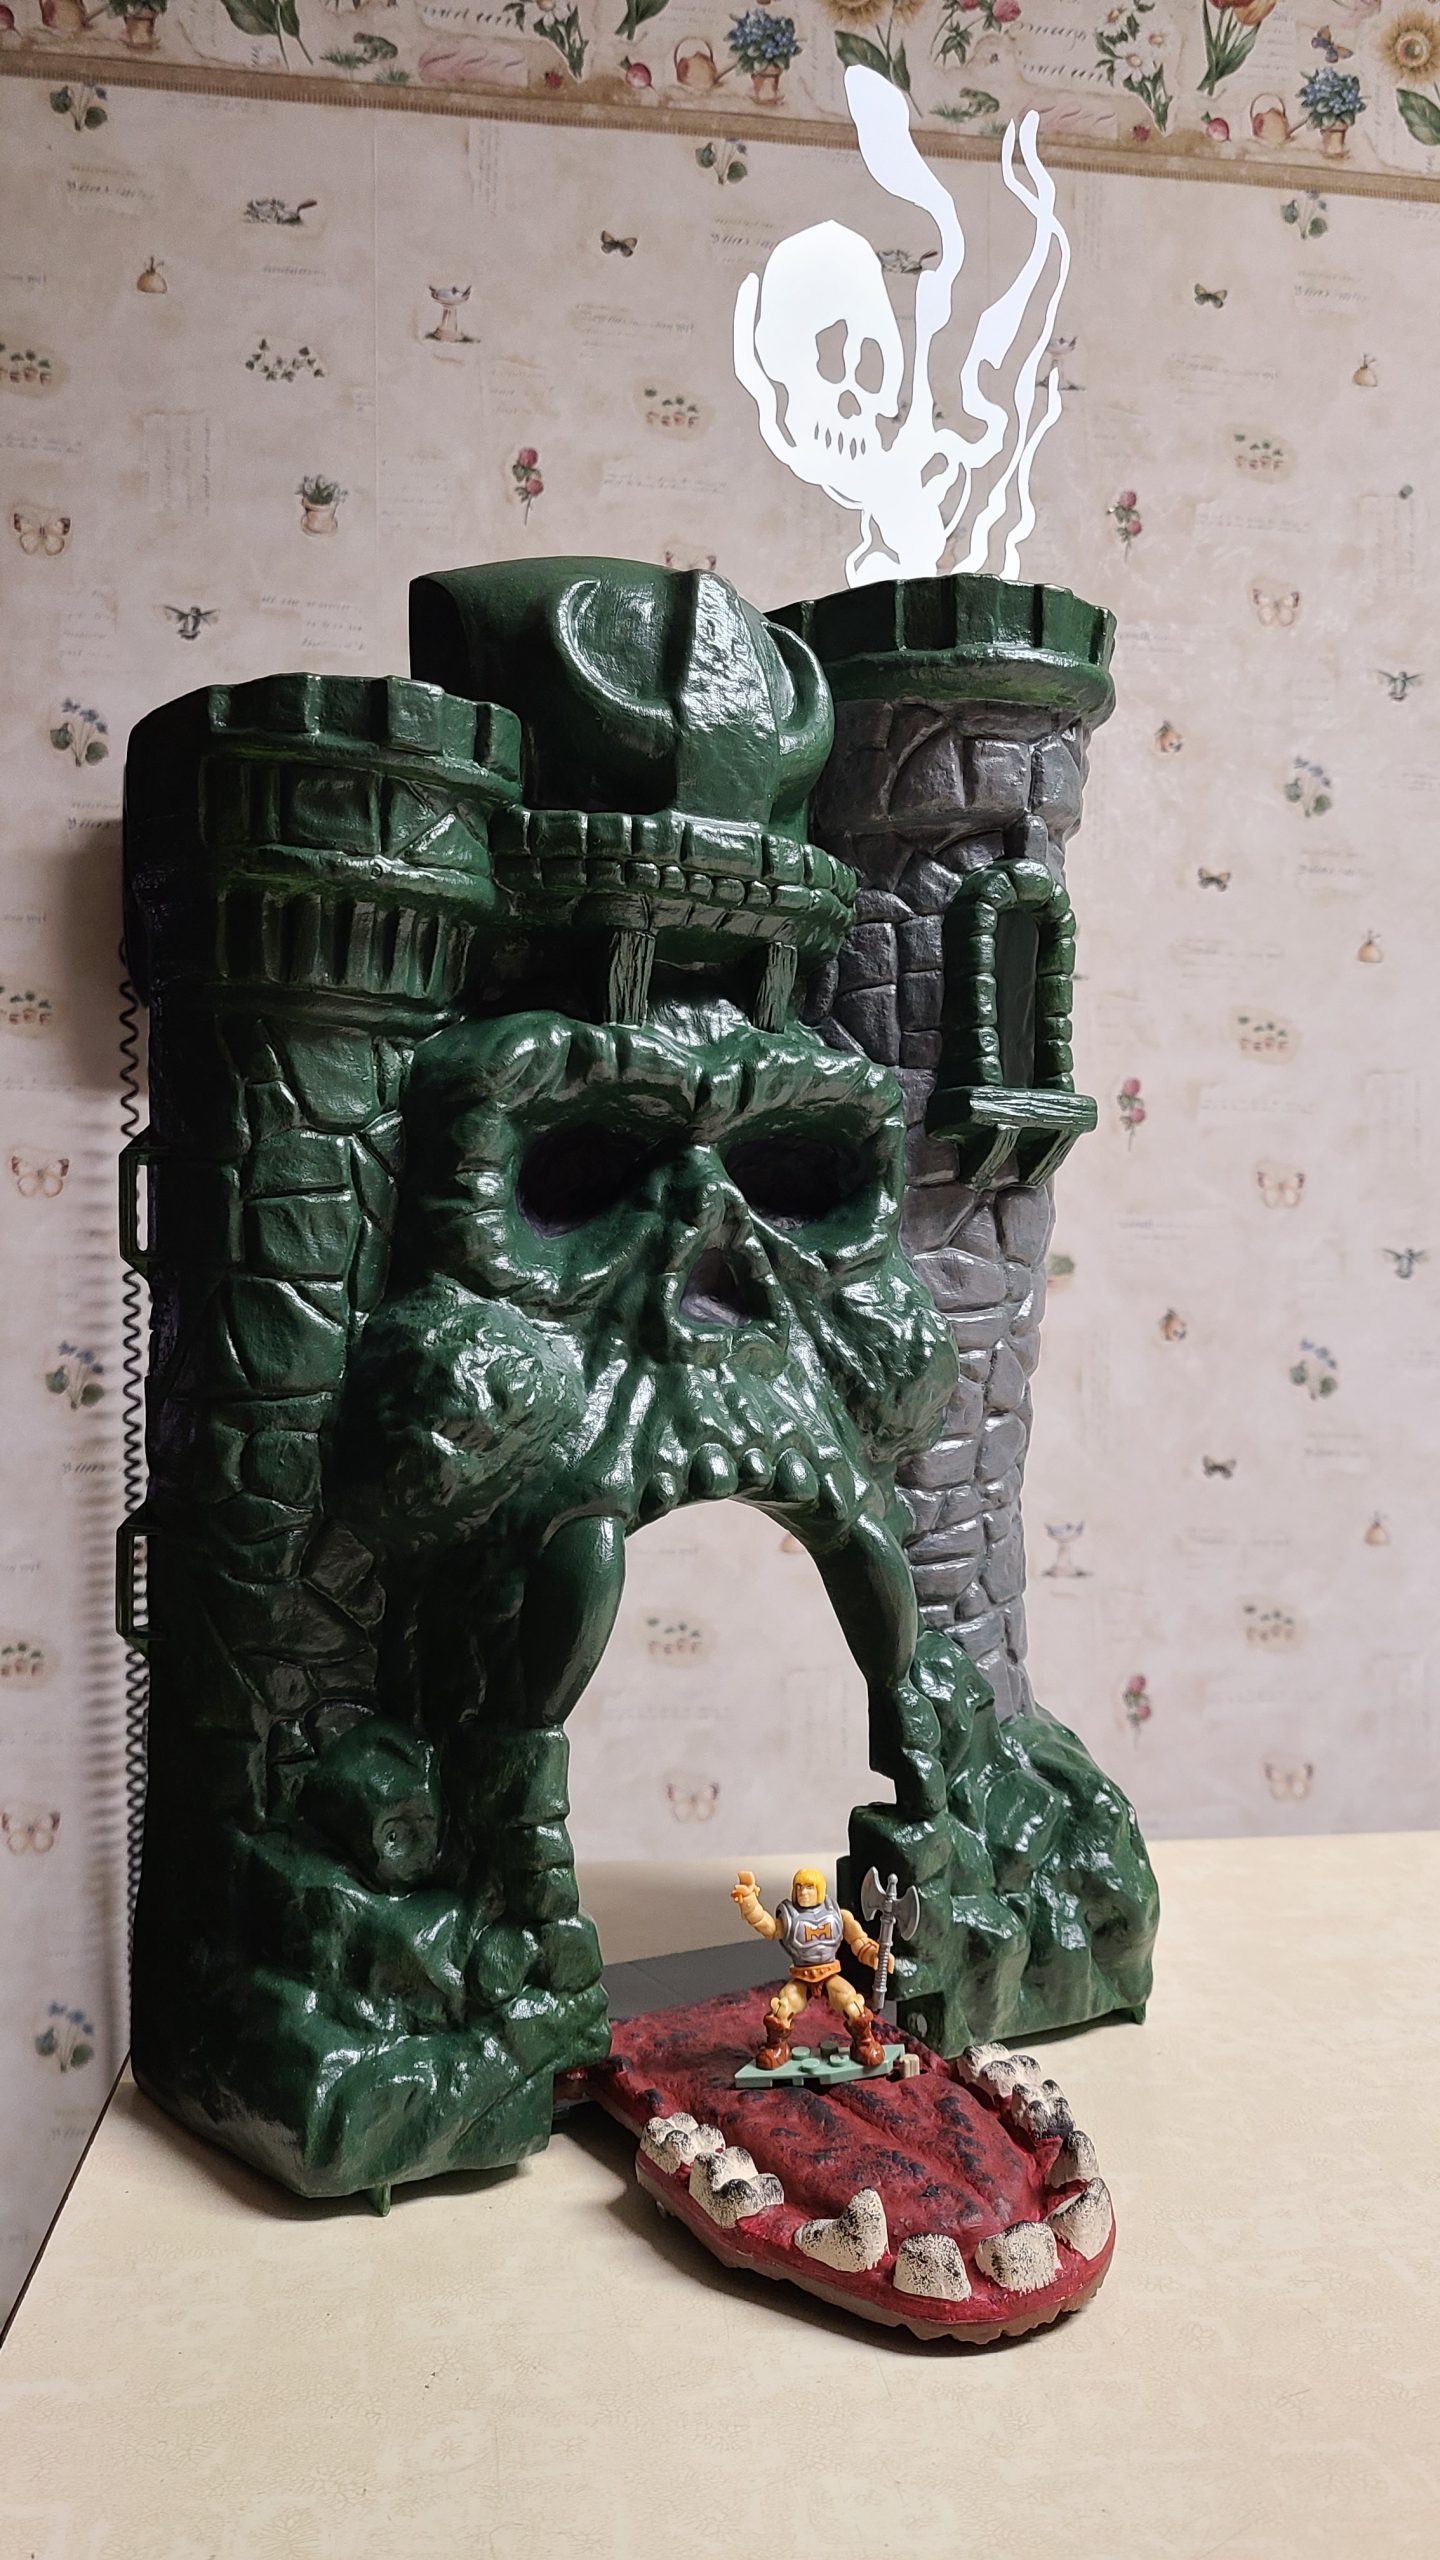
Now for a time of inspiration separate from the initial project! There was a scene in some of the mini-comics that came with the vintage action figures that involved a “spirit” emanating from the castle at times to prophesy of the coming king of the castle (i.e., He-Man), who was regarded to be the Spirit of Castle Grayskull. There have been some enterprising individuals who’ve taken that artwork and put it in the form of a component that can be mounted on the castle, often in glowing colors. While I considered buying one of these, I couldn’t countenance paying as much for this piece as I did for the castle itself…and 150% of that in additional shipping! So I bought a sheet of polystyrene plastic at Hobby Lobby, printed an outline of the artwork, and cut it from the styrene sheet. The first attempt, using an 0.8mil sheet and an exact-o blade, was not very good, with a number of mistakes that couldn’t be repaired cleanly and easily: a second effort with 0.4mil styrene and a pair of very sharp scissors went much better. I assembled a make-shift base using old scrape of styrene tubing onto which it could be mounted, and I had a $4 Spirit of Castle Grayskull!
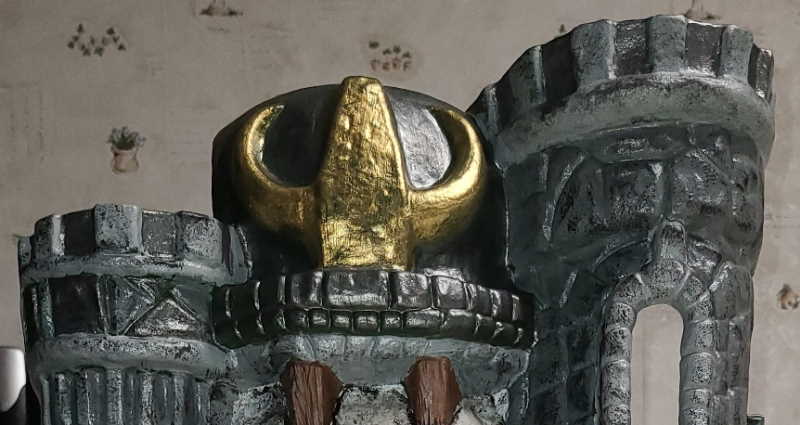
After hitting the woody supports with the same bark brown used on the jaw-bridge door, I selected a medium gray for the towers which came out pretty well, but I wasn’t sure how the ramparts would look in the same color. I didn’t want to start mixing odd-ball colors for each brick as that would take forever. So I mixed the silver gray I used on the door’s “shiny-er” parts with a dab of black, and wound up with a dark metallic gray that looked great! It especially shows well on the brickwork supporting the crown.

Speaking of which, I put that on the crown’s backing, but I dry-brushed it so as to look weather-worn. And on the horns of the crown I dry-brushed gold paint on the green backing which came out smashing! I was conflicted as to how to approach the crown, but that quickly became one of my favorite parts of the project. The crown with the door really makes a statement! Lastly, I used the same ivory white from the jawbridge teeth for the exterior teeth and skull, which at first looked like it might not go over well as it “washed-out” the face due to its tremendous uniformity. To correct that issue, I brushed on a black paint-wash to fill the detailed crevices and wiped it with a damp paper towel, yielding a very weathered and detailed face for the castle. The bulk of the castle was complete, and it looks amazing!
Q: What is Dry-brushing?
A: Dry-brushing is a painting technique that involves applying paint to a dry, stiff-bristled brush, daubing the brush on a dry paper towel to leach out most of the paint, and then brushing the object with it. This deposits pigment on the top-most part of the object being brushed, adding highlights for a more nuanced look. Dry-brushing can be used to add such effects as reflections, shading, or weathering to the object. It’s generally preferable to add lighter details to darker colors.

It’s at this point that I first called it finished, but looking back there are a number of other things to do before I can truly say that. I need to complete the brick-lining/paint-wash on the front brickwork. To this end, I remembered that I’d added some glow paint onto the door, and figured I’d hit the spirit with it, as well…and it went marvelously! A few more coats, and it’ll be bright as can be under black light. Then I mixed a small amount of black with plenty of glow paint, wound up with a solid black mix, brushed it onto a clear plastic package, and hit it with a black light….and the black paint glows! Guess what’s going to be paint-washed into the cracks of the brickwork now? So, that earlier misstep in the basecoat is not only rectified but completely justified!
I also have the entire rear of the castle to complete, but that’s going to be a job for another day. Real-life intrudes and requires attention. But when I have plenty of time (and, more importantly, room) to resume the project, I will either append the progress to this article or create a second part to settle the affair.
MORE TO COME!